The promise of a DIY 3D printer is the ultimate maker fantasy: turn a box of rails, screws, and stepper motors into a machine that can manifest almost any object you can model. But the gap between that fantasy and a reliable, print-ready workhorse is filled with trade-offs in assembly complexity, calibration patience, and material capability that no product page can fully convey. The real question isn’t which printer is the cheapest, but which one will still be running after a hundred hours of prints.
I’m Mohammad Maruf — the founder and writer behind WellFizz. For this guide, I’ve analyzed the hardware specifications, real-world user feedback, and long-term reliability data across nine of the most talked-about DIY kits to separate the machines that reward your effort from those that punish it.
Whether you are a curious beginner or a seasoned tinkerer looking to expand your print farm, finding the right diy 3d printer means balancing your tolerance for assembly against your need for consistent, high-quality output.
How To Choose The Best DIY 3D Printer
Choosing a DIY 3D printer is less about picking a brand and more about understanding the mechanical architecture and firmware ecosystem that match your skill level and project goals. The right choice reduces assembly time and maximizes print reliability.
Understand the Motion System: Bed Slinger vs. CoreXY
Bed slingers move the print bed back and forth on the Y-axis, which can cause the print to shift at high speeds and limits the usable build volume for tall objects. CoreXY printers, like the FlashForge Adventurer 5M and Bambu Lab models, move the print head on a stationary gantry. This allows for faster acceleration without vibration artifacts and a more stable print for tall, detailed models.
Prioritize Automatic Calibration and Input Shaping
Manual bed leveling using a piece of paper is a rite of passage, but the machines that win you over are the ones that do it for you. Look for printers with a load cell sensor (like the Prusa MK4) or an inductive probe that measures the bed at multiple points and compensates for any tilt. Input shaping, which uses firmware to cancel out vibrations, is what allows newer models to print at 600 mm/s without introducing ringing marks on the surface of your models.
Assess Hotend Temperature and Heated Chamber for Material Versatility
A stock hotend that maxes out at 260°C will handle PLA, PETG, and basic TPU. If you want to print engineering-grade materials like Nylon, Polycarbonate, or ABS without warping, you need a hotend that reaches at least 300°C and, critically, an enclosed chamber that can hold a steady 50-65°C temperature. The QIDI Q2 Combo, for example, has a heated chamber that actively prevents layer separation in high-temp materials.
Quick Comparison
On smaller screens, swipe sideways to see the full table.
| Model | Category | Best For | Key Spec | Amazon |
|---|---|---|---|---|
| Bambu Lab A1 Combo | FDM Bed Slinger | Multi-color ease of use | 10,000 mm/s² acceleration | Amazon |
| Bambu Lab P1S Combo | FDM CoreXY | Enclosed high-speed printing | 20,000 mm/s² acceleration | Amazon |
| Original Prusa MK4S KIT | FDM Bed Slinger | Rewarding build & reliability | Loadcell auto-leveling | Amazon |
| Original Prusa MK4 KIT | FDM Bed Slinger | Beginner-friendly learning | Nextruder 32-bit | Amazon |
| QIDI Q2 Combo | FDM CoreXY | Engineering-grade materials | 65°C heated chamber | Amazon |
| Creality K1 Max | FDM CoreXY | Large format & AI features | 300x300x300 mm volume | Amazon |
| FlashForge Adventurer 5M | FDM CoreXY | Plug-and-play entry-level | 3-second nozzle swap | Amazon |
| Longer LK5 Pro | FDM Bed Slinger | Large budget build volume | 300x300x400 mm size | Amazon |
| Creality Ender 3 | FDM Bed Slinger | Ultimate budget tinkering | Resume print function | Amazon |
In‑Depth Reviews
1. Bambu Lab A1 Combo + LED Lamp Kit
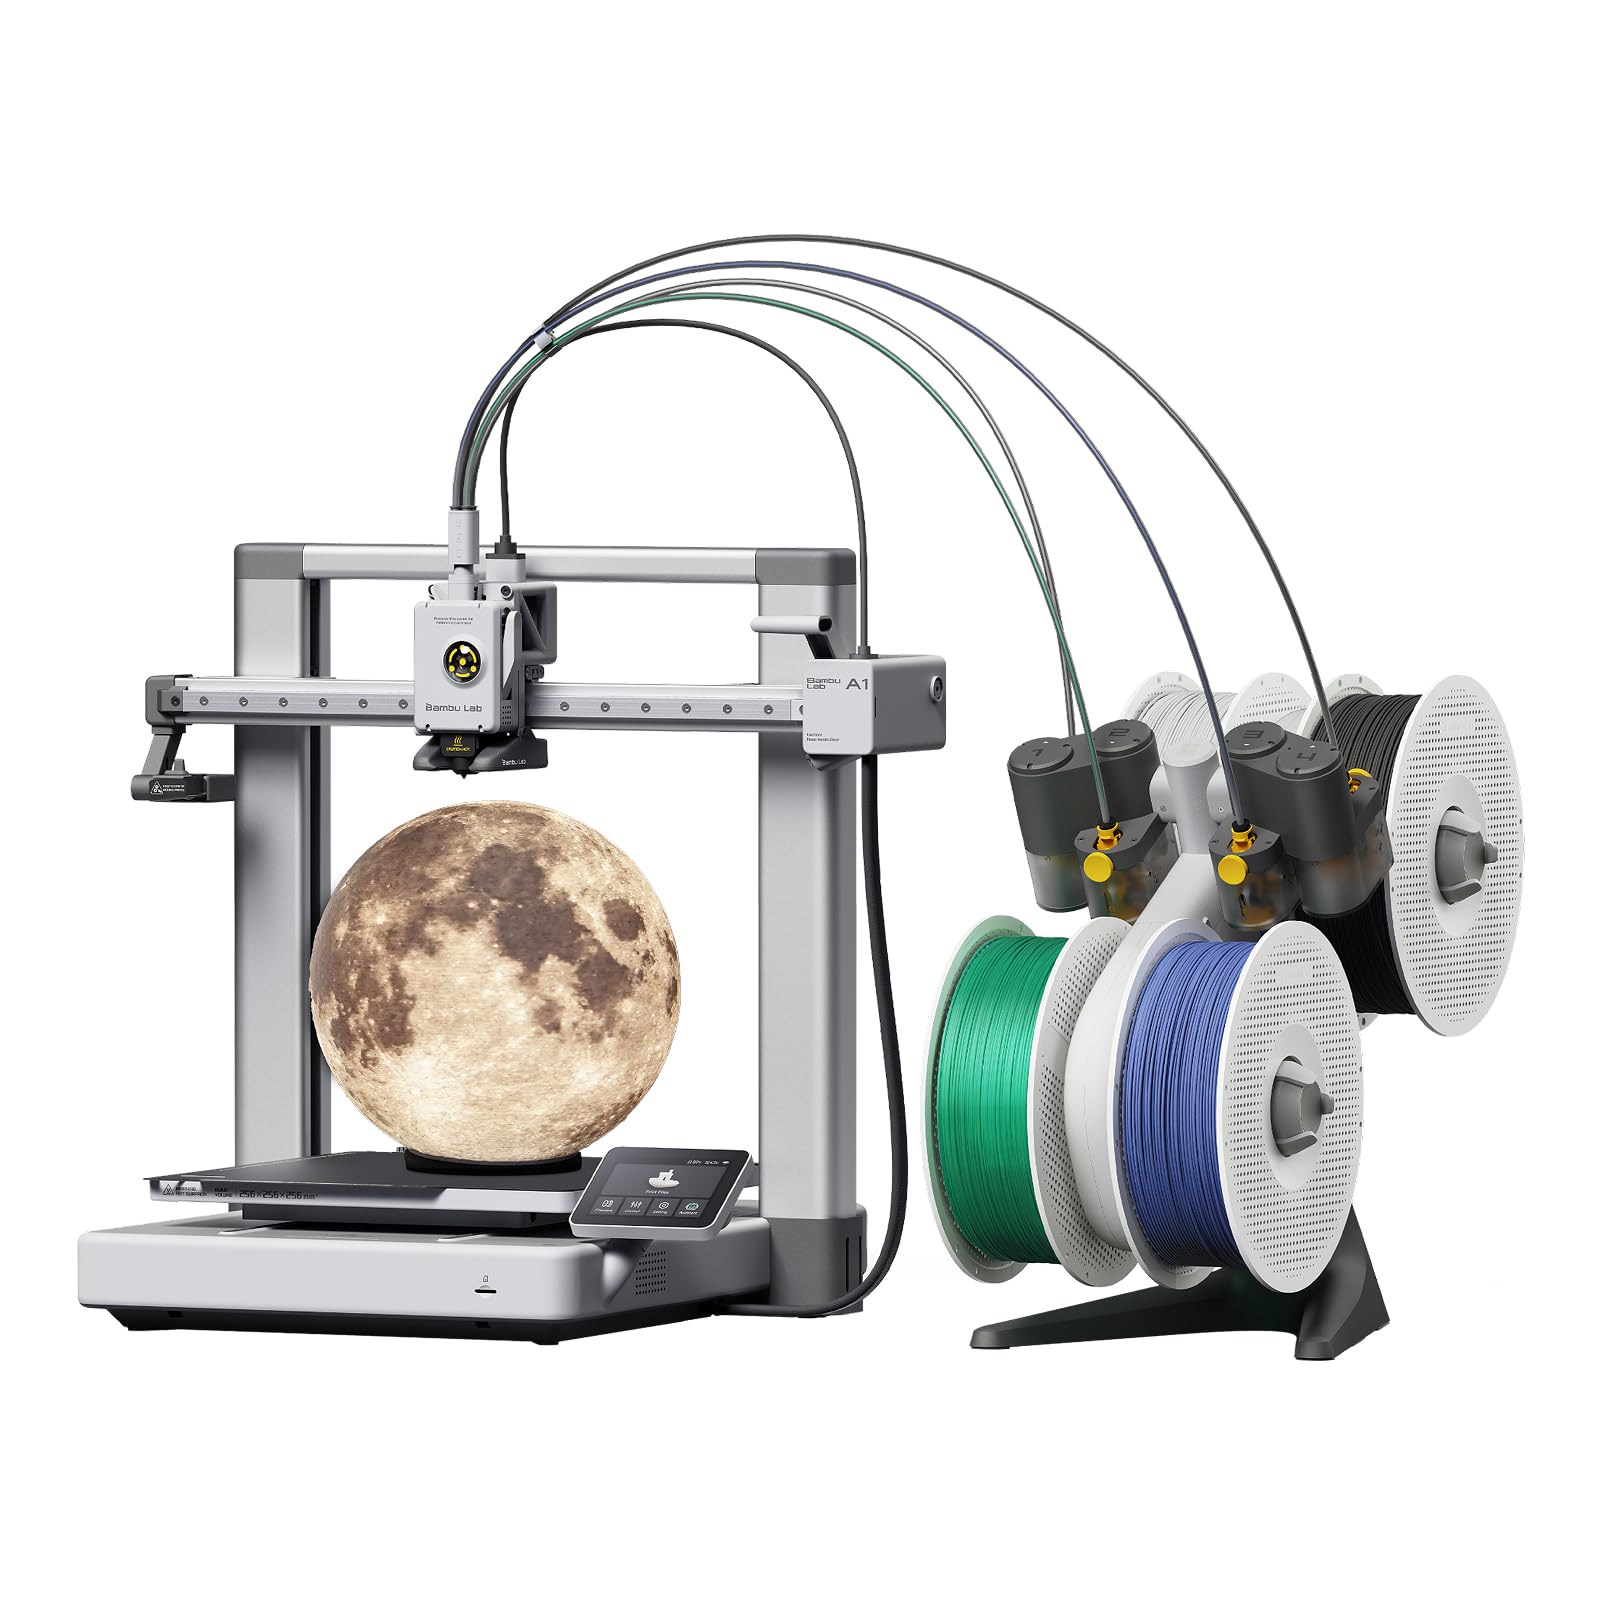
The Bambu Lab A1 Combo is the most complete plug-and-play experience in this list, offering a fully automatic calibration system that handles Z-offset, bed leveling, and vibration compensation before every print. The AMS Lite enables multi-color and multi-material printing without the complex purge-tower waste of older systems, and the active flow rate compensation ensures consistent extrusion even when switching between PLA and PETG mid-print.
The LED Lamp Kit included with this combo expands the printer’s functionality beyond simple prototyping, allowing you to create functional lighting fixtures. Running at a quiet ≤48 dB, it is suitable for home or office environments, and the 1-Clip quick swap nozzle makes maintenance a non-event.
In over ten days of continuous use reported by owners, the A1 Combo has proven to be exceptionally reliable. The main caveat is that setup instructions are minimal, and the printer ships with only a tiny amount of filament, so ordering extra spools before your first print is essential.
Why it’s great
- Full-auto calibration removes the steep learning curve of first-layer tuning
- AMS Lite system for multi-color printing is reliable and easy to load
- Active flow rate compensation delivers smooth, consistent surface quality
Good to know
- Setup instructions are sparse and the included filament is just a few grams
- On the louder end for a home environment despite the low dB rating
2. Bambu Lab P1S + AMS (Combo)

The Bambu Lab P1S is a fully enclosed CoreXY machine designed for users who want to print high-temperature filaments like ABS and ASA without building an enclosure. The AMS combo unlocks up to 16-color multi-material printing when stacking four AMS units, and the printer’s state-of-the-art control algorithm combines vibration compensation with pressure advancement to maintain precision at extreme speeds.
Assembly time is under 20 minutes, with the printer arriving mostly pre-calibrated and ready to run. The enclosed body keeps heat consistent, which is critical for avoiding warping in ABS, and the built-in filtration helps manage fumes. The unit is heavy at 47.5 pounds, reflecting the robust all-metal frame that keeps the gantry rigid during high-speed moves.
A small number of units have reported failures within two months, and customer service response times have been inconsistent. For the vast majority of users, however, the P1S delivers an unmatched speed-to-quality ratio for an enclosed system at this tier.
Why it’s great
- Enclosed design allows for printing ABS, ASA, and other high-temp filaments immediately
- AMS system supports up to 16 colors for complex multi-material models
- Full-auto bed leveling and vibration compensation eliminate manual tuning
Good to know
- Some users report hardware failures within the first two months of ownership
- Customer support response times have been noted as slow by a small subset of buyers
3. Original Prusa MK4S KIT
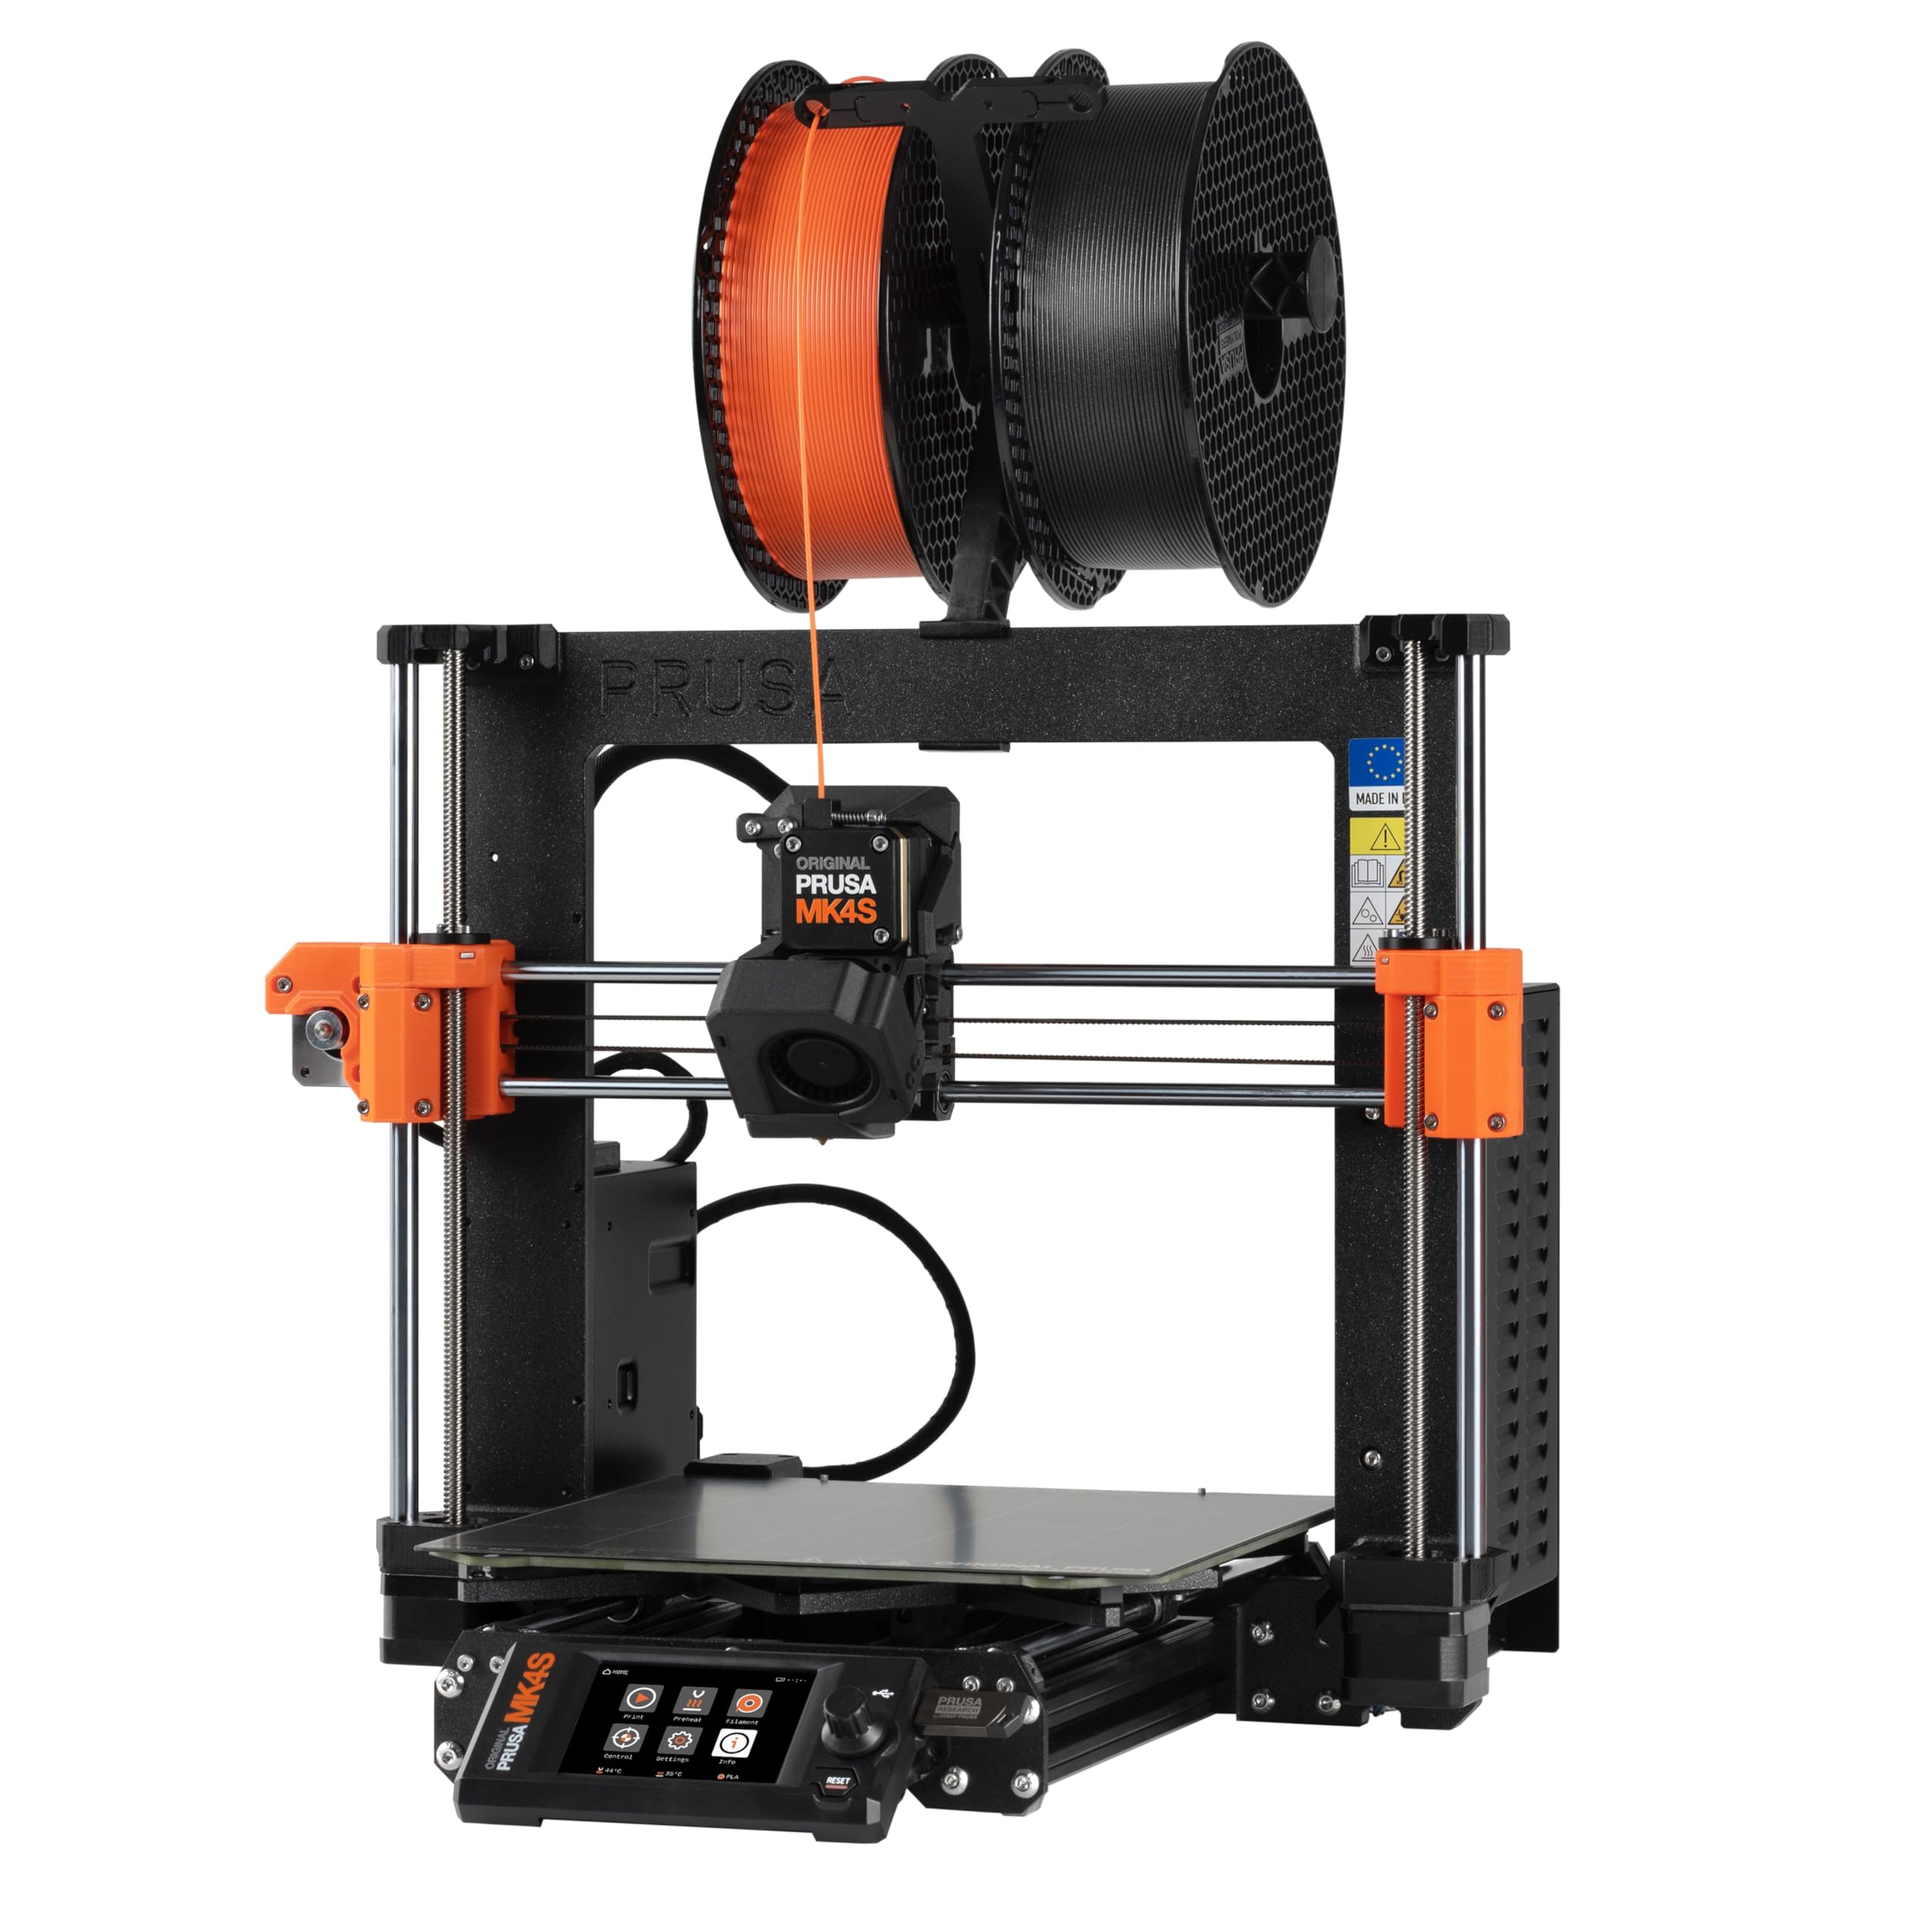
The MK4S KIT is the most rewarding DIY assembly experience in this lineup, providing a step-by-step build guide that teaches the mechanics and electronics of professional-grade 3D printing. The load cell sensor on the nozzle measures the distance to the bed directly, delivering a perfect first layer without any manual paper-leveling ritual. Input shaping reduces ringing at higher speeds, which is rare for a bed-slinger design.
The open-source firmware and modular hardware mean you can swap components, add a MMU3 for multi-material, or upgrade the hotend as the ecosystem evolves. The 12-hour test print of a complex dragon cup completed without supports and came out flawless, demonstrating the reliability of the gantry and extruder design.
Assembly took a full three days for one first-time builder, and the smaller 250x210x210 mm build volume may feel cramped if you plan to print larger cosplay pieces. For those who value long-term repairability and community support over raw speed, the MK4S is a workhorse that will still be running a decade from now.
Why it’s great
- Loadcell sensor ensures perfect first layers every time without manual adjustment
- Fully open-source and modular design allows for extensive future upgrades
- Input shaping delivers clean output at higher speeds for a bed-slinger
Good to know
- DIY kit assembly can take 2 to 3 days for a first-time builder
- Build volume is smaller than many CoreXY alternatives on this list
4. Original Prusa MK4 KIT

The MK4 KIT is the entry point into the Prusa ecosystem, offering the same Nextruder extruder and load cell leveling as the MK4S but without the input shaping upgrade. This makes it an ideal learning platform for a beginner who wants to understand every component of the printer before printing complex parts. The 32-bit platform supports remote printing and customizable UI, and the quick-swap nozzle system allows you to change nozzle sizes in seconds.
In real-world use, the MK4 KIT printed more in one month than an older Ender 5 Pro did in five years, according to one long-time user. The default slicer profiles produce excellent detail at 0.2 mm layer height, and the removable PEI sheet means prints pop off without scraper damage. The printer handles PLA, PETG, and PLA+ without any jams or filament grinding.
Assembly took three days, and the printed parts on the frame are themselves 3D-printable, meaning you can replace any broken component yourself. The main tradeoff is that the MK4 is a bed-slinger with a smaller build volume than comparably priced CoreXY units, and the speed without input shaping is moderate.
Why it’s great
- Nextruder extruder provides reliable, jam-free extrusion with a wide range of filaments
- Load cell bed leveling eliminates the need for manual Z-offset adjustment
- Truly open-source and repairable, with printable replacement parts
Good to know
- KIT assembly is time-consuming and may take several days for a novice
- Bed-slinger design is slower and less suited for tall, high-speed prints
5. QIDI Q2 Combo 3D Printer
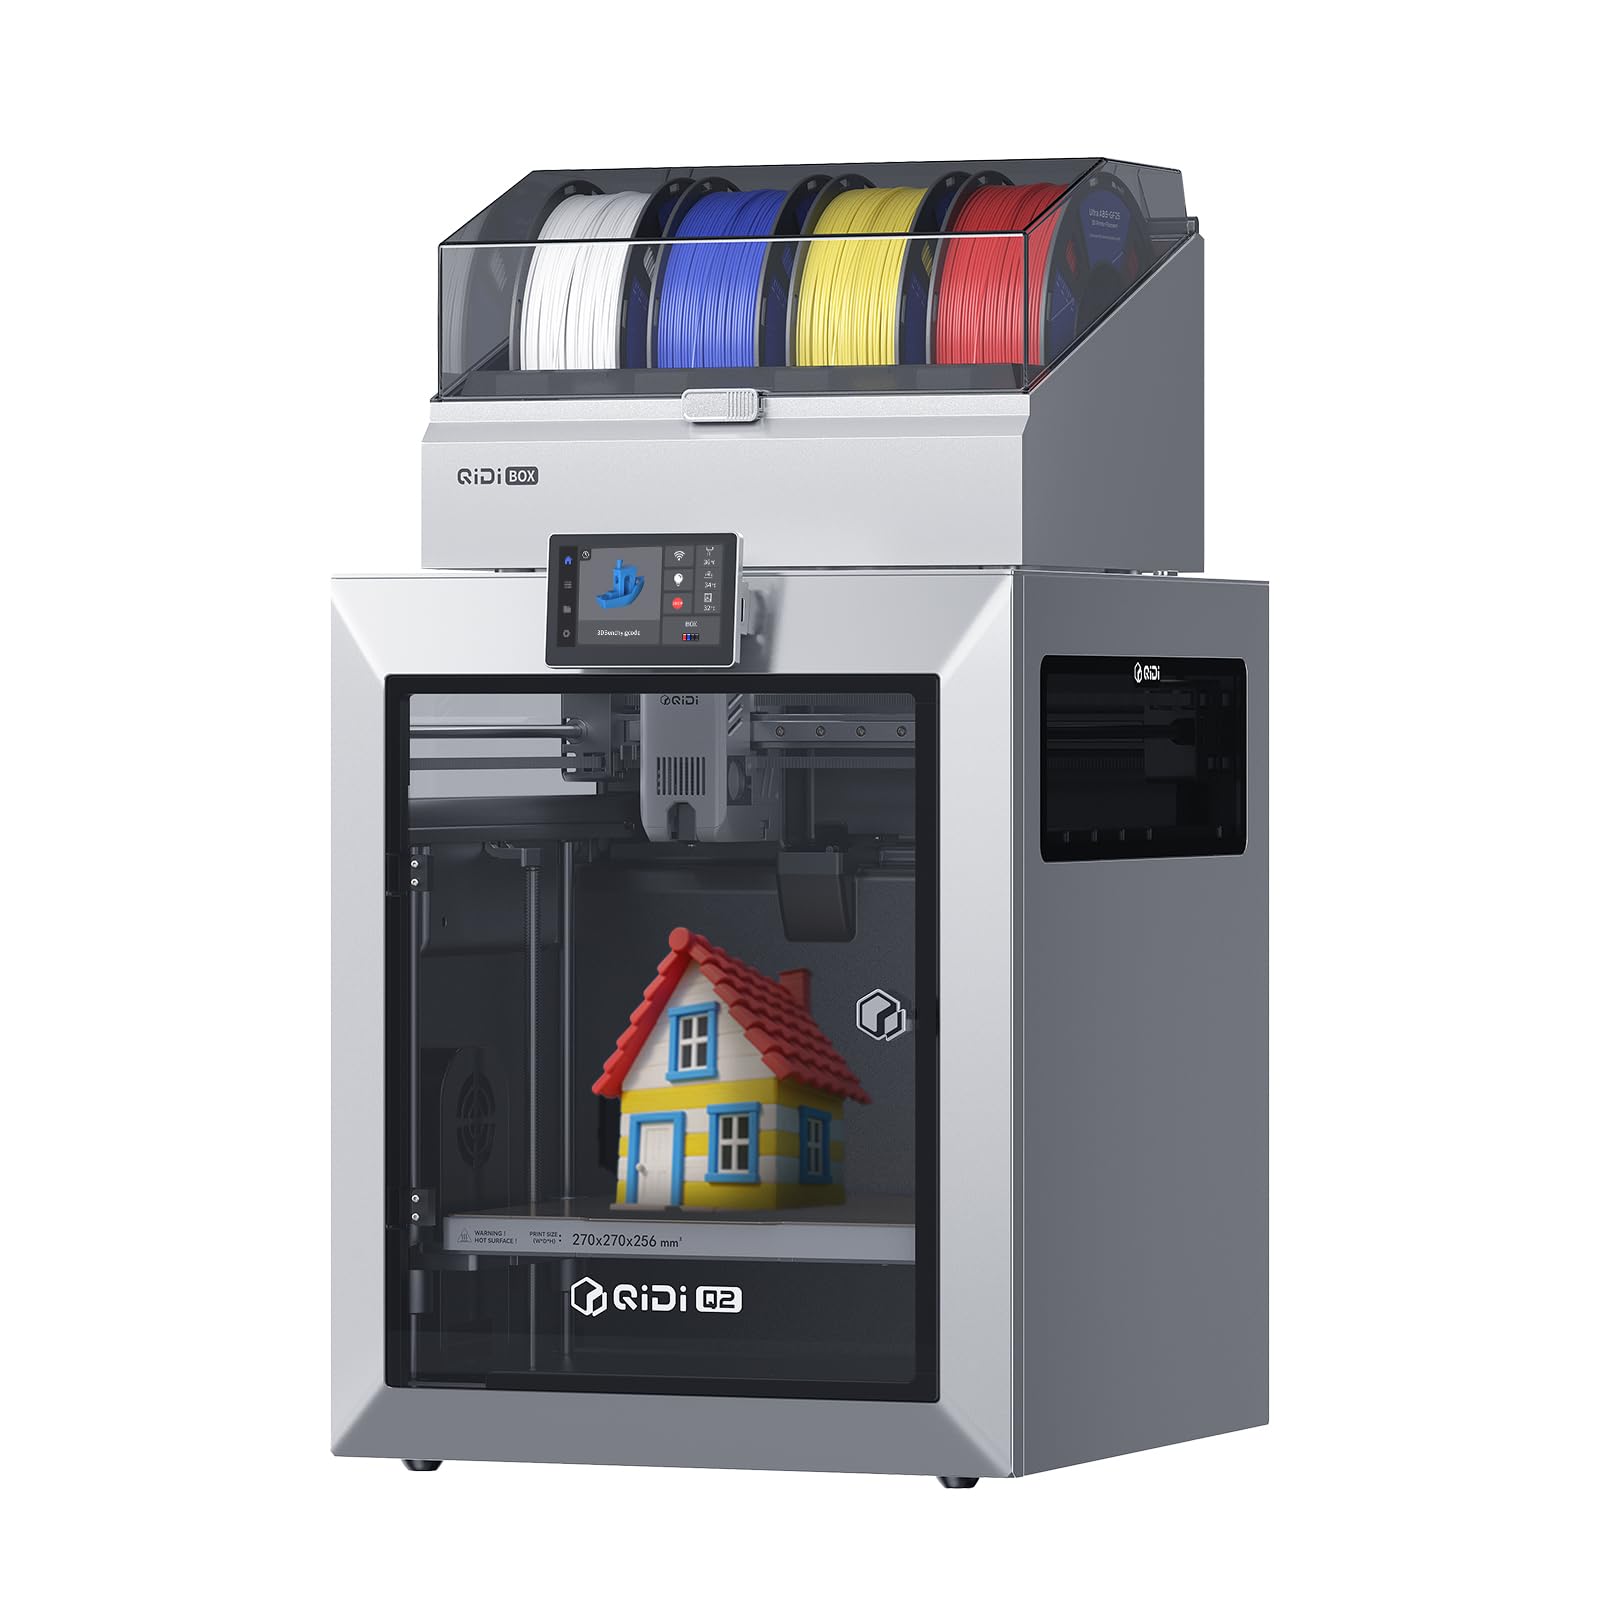
The QIDI Q2 Combo is built for the user who needs to print engineering-grade materials like Nylon, Polycarbonate, and carbon-fiber composites. The second-generation PTC heated chamber maintains a stable 65°C, which actively prevents warping and layer separation in high-temp materials. The 370°C hotend, combined with a hardened steel dual-gear extruder, can handle abrasive filaments without degrading the nozzle.
The enclosed CoreXY system delivers speeds up to 600 mm/s, and the upgraded 1.5GT synchronous belt reduces vibration artifacts for an ultra-smooth surface finish. The triple filtration system with a G3 pre-filter, H12 HEPA, and activated carbon captures harmful particles and fumes, making it safe for indoor use. The automatic filament reloading system and dry-while-print technology in the QIDI BOX keep hygroscopic materials like Nylon in optimal condition throughout long prints.
Setup takes about two hours, and the printer runs fully locally without phone integration. The QIDI BOX connection can be finicky during initial setup, and the occasional firmware update is required to resolve connectivity quirks. Once dialed in, the Q2 delivers professional-grade output that rivals machines costing significantly more.
Why it’s great
- 65°C active heated chamber allows reliable printing of ABS, Nylon, and Polycarbonate
- Triple HEPA/carbon filtration system makes it safe for indoor operation
- Large build volume and 600 mm/s speed for rapid prototyping
Good to know
- QIDI BOX connection can require firmware updates to function reliably
- Some users report inconsistent support response times
6. Creality K1 Max

The Creality K1 Max combines a massive 300x300x300 mm build volume with AI-LiDAR scanning that maps the bed’s tilt at a million points for precise first-layer compensation. The 600 mm/s speed and 20,000 mm/s² acceleration are driven by a full-metal CoreXY frame, and the dual cooling system uses one fan on the print head and another in the build chamber to rapidly solidify layers and prevent deformation.
The AI camera monitors for spaghetti defects and foreign objects, pausing the print and sending an alert to your phone. The strain sensors in the heated bed create an accurate leveling net automatically, so no manual paper-slip leveling is required. The 300°C hotend with a ceramic heater can melt filament quickly, and the 32 mm³/s flow ensures that high-speed prints don’t starve the nozzle.
While the K1 Max is an impressive machine, a small number of units have arrived with non-functional screens, and Creality’s customer service has been criticized for slow response times. For users who get a fully working unit, the K1 Max delivers exceptional value for large-format, high-speed printing with smart monitoring.
Why it’s great
- AI-LiDAR and camera provide automatic bed leveling and print failure detection
- Large 300x300x300 mm build volume for printing multiple models or large parts
- High flow rate and dual cooling for fast, deformation-free prints
Good to know
- Some units have arrived with defective electronics and screens
- Customer support response times can be slow from Creality
7. FlashForge Adventurer 5M

The Adventurer 5M is the most straightforward printer for a beginner who just wants to print without any calibration ritual. The fully automatic bed leveling ensures that every first layer sticks without fuss, and the CoreXY structure with 600 mm/s travel speed and 20,000 mm/s² acceleration allows for rapid prototyping. The 3-second nozzle swap system is a standout feature, making it trivial to switch between 0.25 mm for fine detail and 0.8 mm for fast infill.
The dual-sided PEI platform offers excellent adhesion, and the vibration compensation algorithm keeps the surface quality clean even at high speeds. The printer is quite loud, however, making it unsuitable for a bedroom or shared workspace. The initial sample filament is coiled loosely rather than on a spool, which can cause jamming if not handled carefully.
Despite those minor inconveniences, the Adventurer 5M has proven reliable over hundreds of hours for PLA and PETG prints, delivering consistent results with zero manual bed-leveling effort. It’s a strong entry-level choice for anyone who values speed and convenience over tinkering.
Why it’s great
- Fully automatic bed leveling ensures perfect first layers every time
- CoreXY design delivers high speed and acceleration without vibration artifacts
- 3-second detachable nozzle system makes maintenance and size swaps convenient
Good to know
- Loud operation due to motor and fan noise; not suitable for quiet spaces
- Sample filament can cause jams and the initial setup may require troubleshooting
8. Longer LK5 Pro 3D Printer

The LK5 Pro offers a massive 300x300x400 mm build volume at a budget-friendly price, making it an attractive option for printing large cosplay pieces or functional prototypes. The triangular reinforced frame provides stability at this scale, and the upgraded 32-bit motherboard with TMC2209 drivers keeps the printer remarkably quiet during operation. The silicon carbide lattice glass platform provides uniform heating across the bed for strong adhesion.
The printer supports filament depletion detection and power-loss recovery, which are critical for long prints that might run overnight. With the ability to reach 180 mm/s print speed and 0.1 mm precision, it can handle both rapid prototyping and detailed work. Users have successfully printed PLA, PETG, ABS, and TPU with minimal issues after initial calibration.
The manual leveling knobs are inconsistent, however, and adding an auto-leveling system requires complex wiring and firmware flashing. Some users have received units with warped beds, and software compatibility issues can make the first print frustrating. For the price, the build volume is unmatched, but it demands more patience from its owner.
Why it’s great
- Extremely large 300x300x400 mm build volume for large-format prints
- TMC2209 silent drivers keep operation quiet for home use
- Filament detector and power-loss recovery for worry-free long prints
Good to know
- Manual bed leveling is frustrating and inconsistent; auto-leveling is a complex retrofit
- Some units have arrived with warped beds, making leveling nearly impossible
9. Creality Ender 3

The Ender 3 is the default entry point for anyone who wants to learn 3D printing from the ground up. The fully open-source design means you can replace any component, upgrade to a direct drive extruder, add a BLTouch, and install custom firmware. The resume printing function is a practical feature for power-loss protection, and the V-slot wheels on POM material provide quiet, smooth motion along the gantry.
The print quality at a 0.2 mm layer height is surprisingly good for the cost, especially after calibrating extruder steps and retraction. The stock plastic extruder is prone to cracking, however, and the bed surface on older models is a sticker that wears out quickly. Most users end up replacing the bed springs with silicone spacers and adding a glass or PEI plate.
Customer reviews run the full spectrum from “surprisingly capable” to “a year of pain,” with endless stringing, clogs, and inconsistent results. If you see the Ender 3 as a kit to modify and optimize, it’s a fantastic learning tool. If you want to print reliably without constant adjustment, you will quickly outgrow it.
Why it’s great
- Fully open-source with a massive community for troubleshooting and upgrade guides
- Resume printing function protects against power outages during long prints
- Huge potential for customization and performance upgrades over time
Good to know
- Stock extruder is plastic and prone to cracking; a metal upgrade is essential
- Inconsistent print quality requires constant tinkering and calibration
FAQ
How many hours does it take to assemble a DIY 3D printer kit?
Do I need a heated chamber to print ABS filament?
Final Thoughts: The Verdict
For most users, the diy 3d printer winner is the Bambu Lab A1 Combo because it combines full-auto calibration, multi-color printing, and active flow rate compensation into a package that just works out of the box. If you want to print engineering-grade materials with a heated chamber, grab the QIDI Q2 Combo. And for the purest DIY experience that teaches you how every part works, nothing beats the Original Prusa MK4S KIT.

Mo Maruf
I created WellFizz to bridge the gap between vague wellness advice and actionable solutions. My mission is simple: to decode the research and give you practical tools you can actually use.
Beyond the data, I am a passionate traveler. I believe that stepping away from the screen to explore new environments is essential for mental clarity and physical vitality.