Stepping into 3D printing for the first time can feel like choosing between a dozen different hobbies, each with its own jargon, setup rituals, and hidden costs. The real challenge isn’t mastering the slicer or understanding infill patterns — it’s finding a machine that actually lets you enjoy the process from the very first print.
I’m Mohammad Maruf — the founder and writer behind WellFizz. I’ve spent years analyzing the hardware specifications of desktop manufacturing tools, from stepper motor torque to chamber thermistor response curves, so you don’t have to guess which printer will actually work out of the box.
Whether you want to print miniatures, functional prototypes, or classroom projects, choosing the right entry point saves weeks of frustration, which is why I’ve spent dozens of hours researching the best beginner 3d printers for every type of first-time maker.
How To Choose The Best Beginner 3D Printers
Start with the technology that matches what you want to make. FDM printers use melted plastic filament and are ideal for functional parts, toys, and general tinkering. Resin printers use liquid photopolymer cured by UV light and deliver much finer detail for miniatures, jewelry, and dental models — but they require ventilation, gloves, and post-processing cleanup. Your first decision is which workflow fits your space and patience level.
Print Volume and Realistic Expectations
A build volume of 220 x 220 x 250 mm is the sweet spot for most beginners — big enough to print a helmet visor or a phone stand, small enough to keep the machine compact. Smaller machines (under 150 mm on any axis) limit you to keychains and chess pieces. Resin printers typically top out at around 165 mm on the Z-axis, which is still enough for most tabletop miniatures. Never buy a printer solely on maximum build volume if your actual projects are smaller; a larger heated bed is harder to keep level.
Auto-Leveling and First-Layer Success
Nothing kills the enthusiasm of a new maker faster than a printer that can’t lay down a consistent first layer. Automatic bed leveling — whether through inductive probes (CR Touch), capacitive sensors, or integrated load cells — eliminates the need to fiddle with paper and thumbscrews before every print. Look for a system that runs a multi-point grid (16 to 49 points) and compensates for minor bed warpage. Machines that require manual leveling are cheaper but significantly more frustrating for absolute beginners.
Hotend Temperature and Filament Support
A stock hotend that reaches 260°C lets you print PETG and basic TPU. A hotend rated for 300°C opens up ABS, polycarbonate blends, and carbon-fiber-infused materials. If your plans only involve PLA, a lower-temperature hotend is fine, but having that extra thermal headroom means you won’t need to upgrade later. For beginners sticking to PLA and PETG, a 260°C hotend is sufficient; for those who want to experiment with engineering-grade materials, a 300°C+ hotend with an all-metal heat break is the smarter choice.
Speed, Acceleration, and Motion Systems
Printing speed (measured in mm/s) and acceleration (mm/s²) determine how fast the print head moves. A CoreXY motion system can hit 500–600 mm/s with high acceleration because the heavier motors stay stationary, while a traditional bedslinger (like the Ender series) moves the whole print bed on the Y-axis, limiting top speeds to roughly 200–250 mm/s before quality degrades. For a beginner, a printer with 300–500 mm/s capability and input shaping (vibration compensation) will finish prints in half the time without sacrificing detail.
Quick Comparison
On smaller screens, swipe sideways to see the full table.
| Model | Category | Best For | Key Spec | Amazon |
|---|---|---|---|---|
| Bambu Lab A1 | FDM | Plug-and-play multi-color | 10,000 mm/s² acceleration | Amazon |
| Creality K1C | FDM | Carbon fiber & high-temp | 300°C tri-metal nozzle | Amazon |
| Anycubic Kobra X | FDM | Multi-color up to 19 colors | 600 mm/s, 49-point leveling | Amazon |
| ELEGOO Centauri Carbon | FDM | CoreXY with enclosure | 320°C hotend, 256 mm³ volume | Amazon |
| FLASHFORGE Adventurer 5M | FDM | Ultra-fast open-frame | 20,000 mm/s² acceleration | Amazon |
| Creality Ender-3 V3 KE | FDM | Customizable tinkerers | 500 mm/s, 300°C Sprite extruder | Amazon |
| ANYCUBIC Photon Mono 4 | Resin | Ultra-detailed miniatures | 10K 7″ LCD, 17×17 μm pixels | Amazon |
| Geeetech Smart M1S | FDM | Compact desk-friendly | 250 mm/s, 3.94″ cube volume | Amazon |
| Entina Tina2C | FDM | Kids & STEM education | 3.9″ cube, phone app control | Amazon |
In‑Depth Reviews
1. Bambu Lab A1

The Bambu Lab A1 redefines what a beginner should expect from a desktop printer. At 10,000 mm/s² acceleration and active flow rate compensation, it produces consistently smooth layers without the trial-and-error calibration that plagues cheaper bedslingers. The 256 × 256 × 256 mm build volume is generous enough for full-size helmet parts or functional brackets, and the ≤48 dB noise level means it won’t dominate your living space.
Full-auto calibration covers Z-offset, bed leveling, vibration compensation, and flow rate — all without touching a single screw. The quick-swap nozzle system with a 1-Clip mechanism reduces downtime, and compatibility with the optional AMS Lite allows multi-color prints using up to four filaments simultaneously. Over 1,500 hours of use in long-term reviews show durable hardware with only minor material warnings for high-temperature filaments.
The trade-off is that multi-color printing requires the separate AMS Lite purchase, and the proprietary ecosystem means replacement parts come exclusively from Bambu Lab. For a beginner who wants to print reliably from day one without learning G-code or bed leveling, the A1 is the gold standard. Its intuitive touchscreen and intuitive slicer make it the closest thing to an appliance in the 3D printing world.
Why it’s great
- True plug-and-play with full auto-calibration
- Exceptionally quiet operation (≤48 dB)
- Active flow rate compensation for flawless surface finish
- Multi-color capability via optional AMS Lite
Good to know
- Multi-color requires separate AMS Lite purchase
- Proprietary parts limit third-party repair options
- Not enclosed for high-temperature filaments like ABS
2. Creality K1C

The Creality K1C brings CoreXY speed — 600 mm/s with 20,000 mm/s² acceleration — into an enclosed chassis that handles carbon-fiber filaments like PLA-CF and PETG-CF right out of the box. The hardened steel nozzle tip resists wear from abrasive materials, and the built-in active carbon filter scrubs fumes, making it acceptable for indoor use. The AI camera monitors for spaghetti failures and supports time-lapse recording without a separate setup.
The clog-free extruder design uses a one-piece tri-metal nozzle and heat break that prevents thermal creep, and Creality OS is Klipper-based, meaning advanced users can tweak macros and pressure advance settings through the open-source firmware. The pre-assembled build requires only a few minutes of unboxing, and the one-tap auto-leveling handles the rest. The 220 × 220 × 250 mm print volume is standard, but the enclosed chamber and high-temperature capability set it apart from open-frame alternatives.
Some users report the smooth build plate requires a glue stick for PLA adhesion, and the documentation could be more beginner-friendly — YouTube guides are a practical supplement. At this price point, the K1C competes with Bambu Lab’s P1P on speed and features while being more capable with engineering-grade materials out of the box. For a beginner who already knows they want to print functional parts in advanced filaments, this is the right choice.
Why it’s great
- Fully enclosed for carbon-fiber and ABS printing
- 600 mm/s CoreXY with 20,000 mm/s² acceleration
- Built-in AI camera and active carbon filter
- Open-source Klipper firmware for advanced tuning
Good to know
- Smooth plate may need glue stick for PLA
- Documentation is sparse for absolute beginners
- Customer support response times can be slow
3. Anycubic Kobra X Multicolor
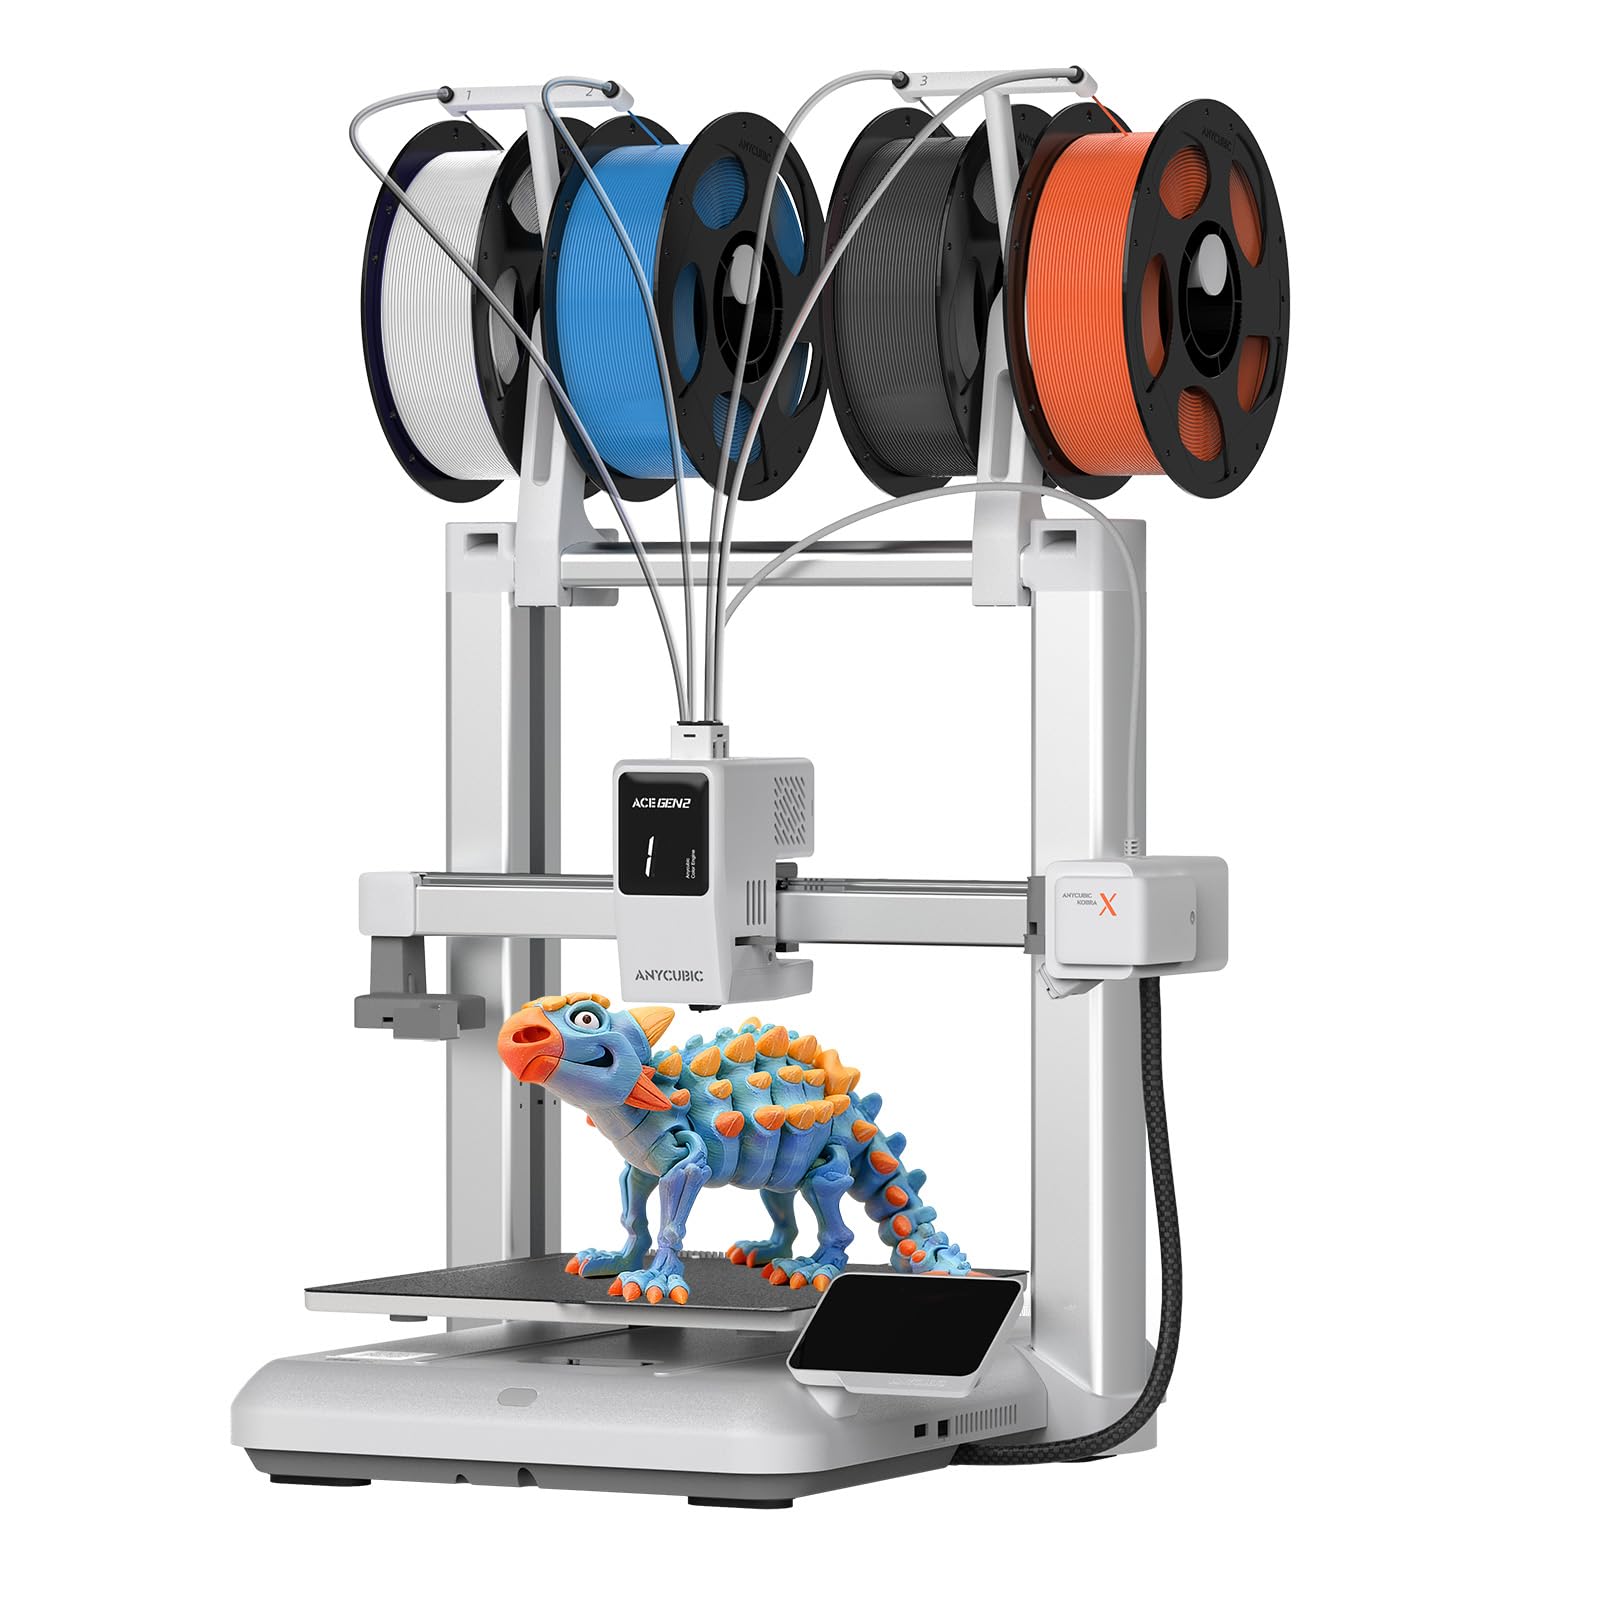
The Anycubic Kobra X natively supports four-color printing without requiring a separate add-on unit, using the integrated ACE 2 Pro system to handle up to 19 colors when expanded with additional modules. The 600 mm/s maximum speed and vibration compensation produce clean prints at pace, and the 49-point LeviQ 3.0 auto-leveling system ensures bed flatness within microns before every job. The top-mount spool holder frees up desk space, and the dual-band Wi-Fi (2.4G/5G) enables reliable remote monitoring through the Anycubic app.
One standout feature is the reduction in filament purge waste — Anycubic claims an 81.25% reduction in material loss during color changes, which translates into real savings over time. The hardened steel nozzle handles abrasive filaments, and the 300°C hotend supports PLA, PETG, TPU, PVA, and ASA. The built-in AI camera detects spaghetti failures and foreign objects, halting the print before the mess worsens. A 10,000+ free model library is accessible through the app, making it easy to find something to print immediately.
Quality control has been inconsistent in early units, with some buyers reporting defective filament sensors or support communication issues. The phone app UI could also use refinement. For a beginner who wants multi-color capability from day one without buying a separate AMS unit, the Kobra X offers a compelling package at a reasonable premium. The automated workflow keeps complexity low, though you should verify the unit is fully functional early in the return window.
Why it’s great
- Native multi-color printing (4 colors, expandable to 19)
- 81% less filament waste during color changes
- 49-point LeviQ 3.0 auto-leveling
- Dual-band Wi-Fi with AI spaghetti detection
Good to know
- Occasional quality control issues reported
- Phone app could be more polished
- ACE 2 Pro modules required for expanded color palette
4. ELEGOO Centauri Carbon
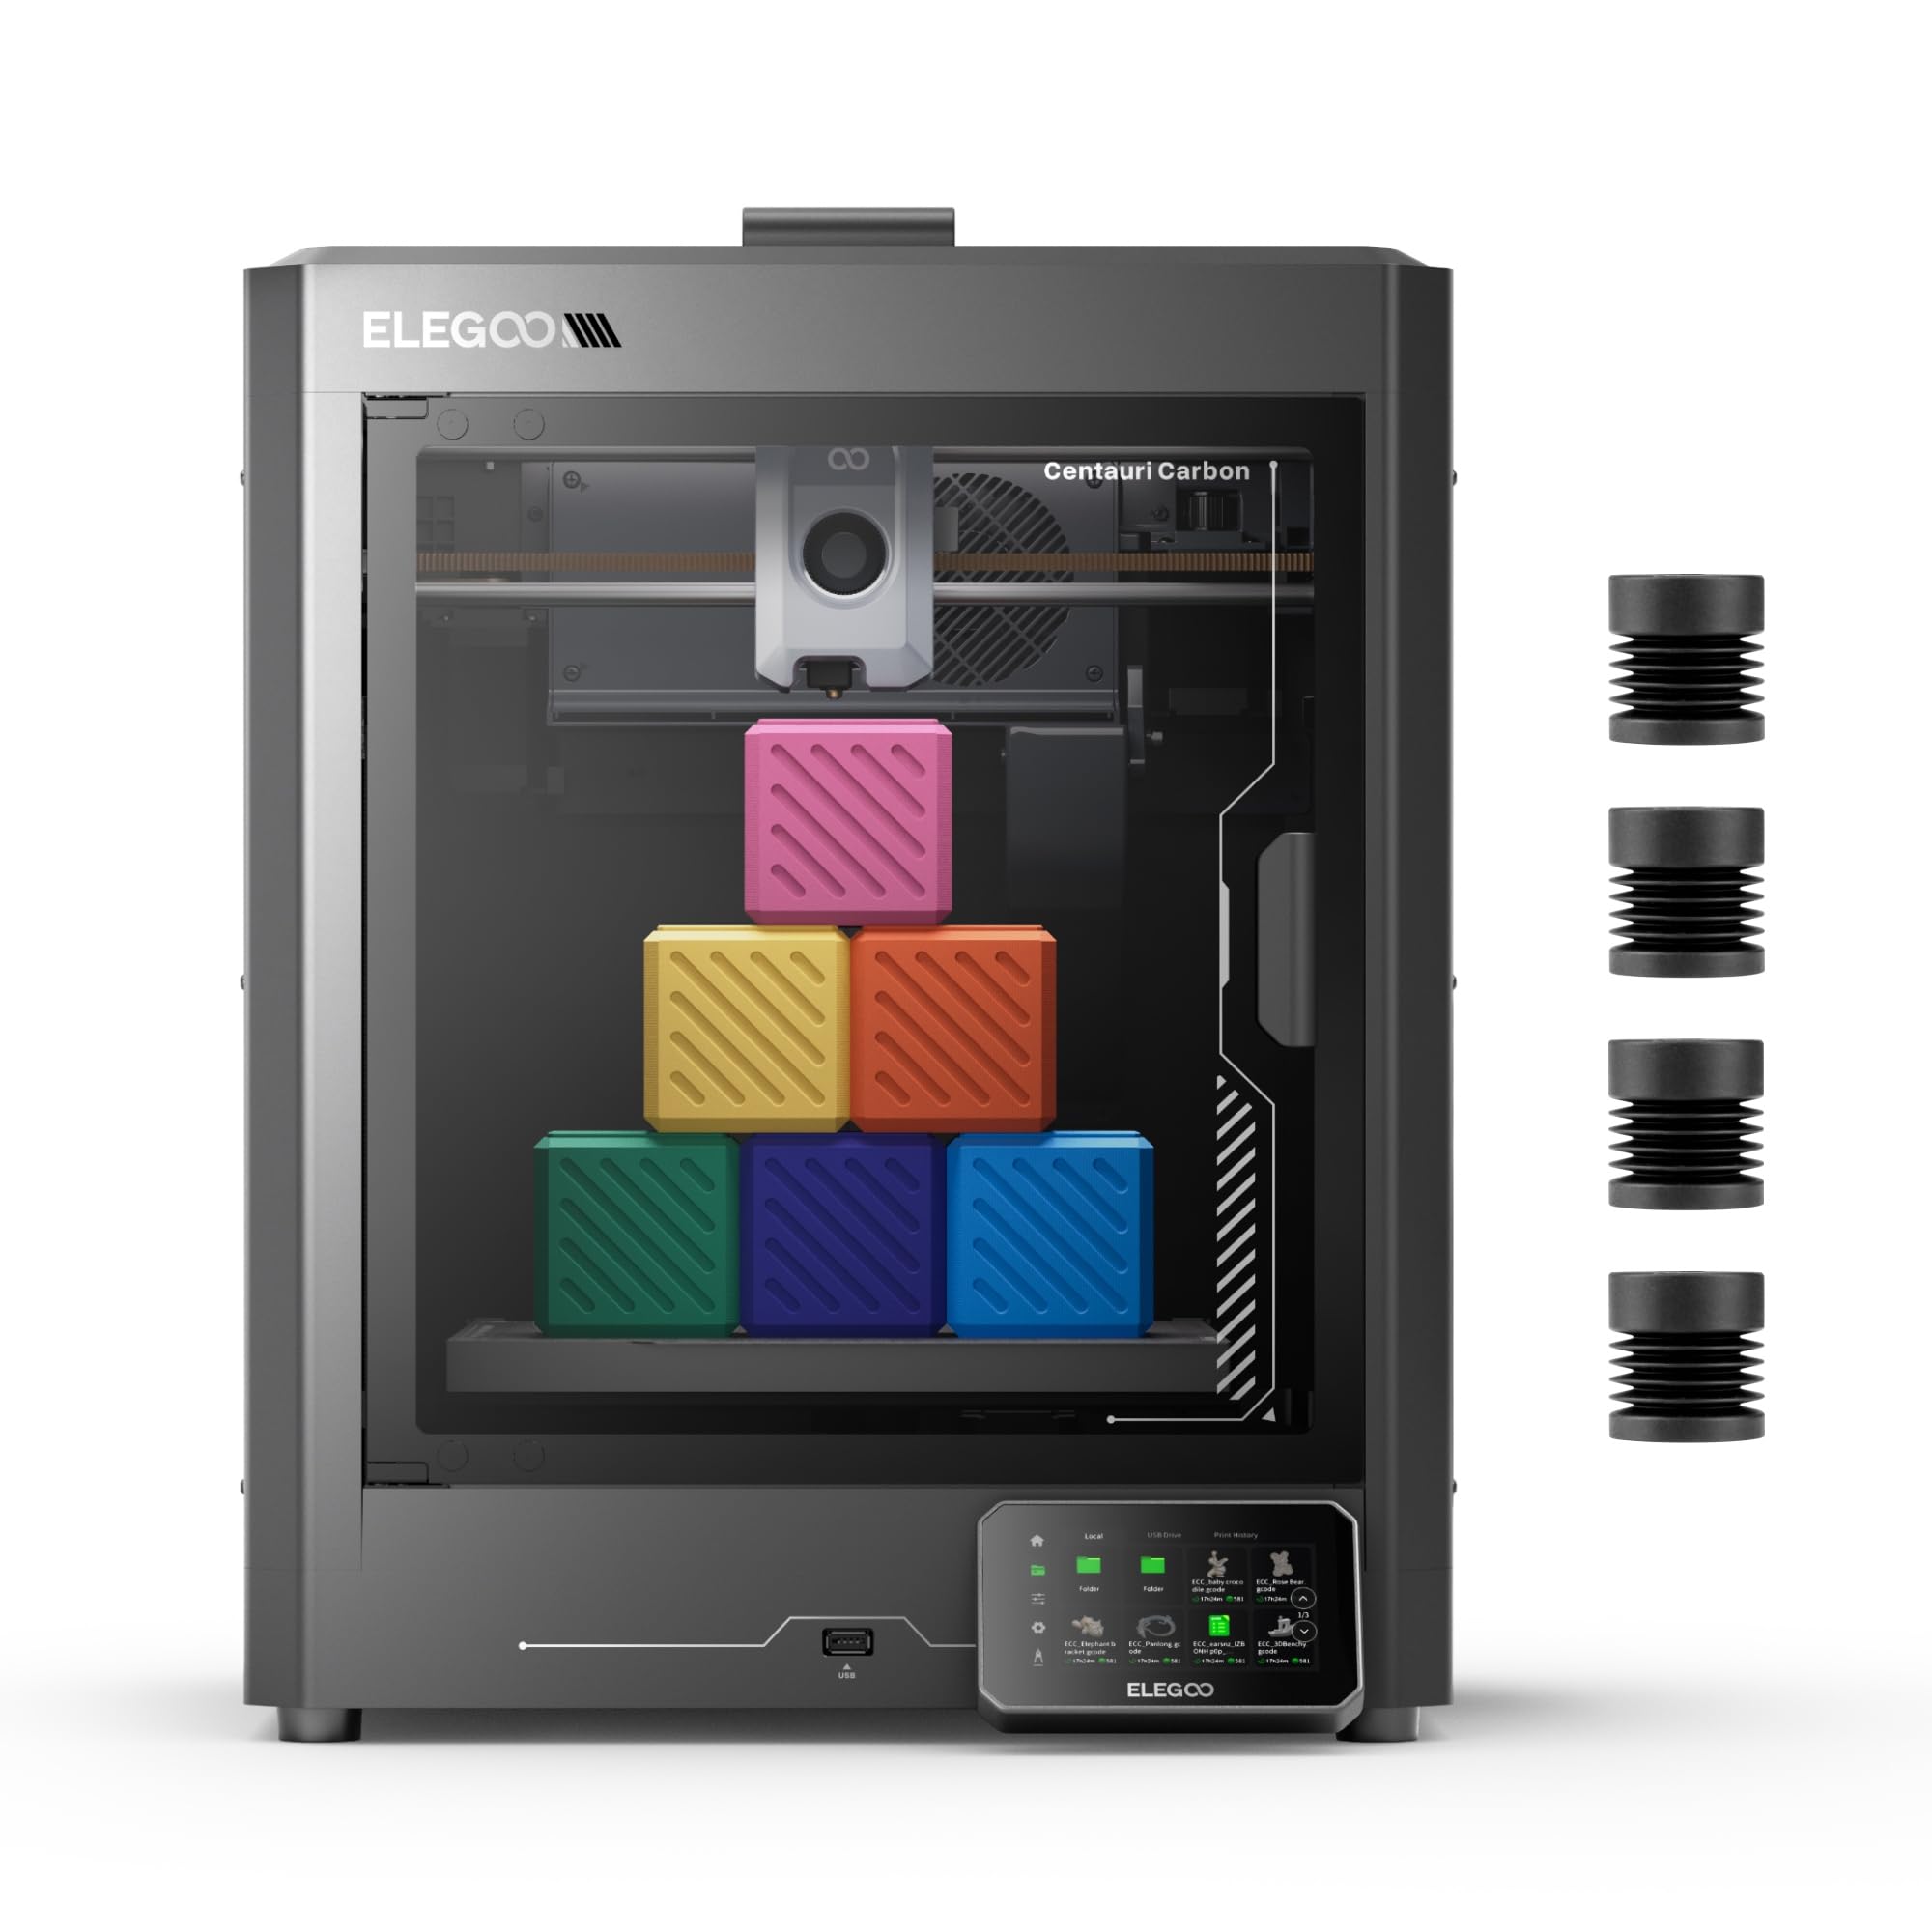
The ELEGOO Centauri Carbon arrives fully assembled and pre-calibrated with a rigid die-cast aluminum frame that minimizes vibration even at 500 mm/s print speeds and 20,000 mm/s² acceleration. The enclosed chamber with enhanced cooling supports high-performance filaments including carbon-fiber-reinforced materials, and the 320°C brass-hardened steel nozzle ensures reliable extrusion of demanding composites. The 256 × 256 × 256 mm build volume matches the Bambu Lab A1, providing a true cubic foot of printable space.
Auto bed leveling is fully automatic with vibration compensation and pressure advance baked into the firmware. The dual-sided PEI build plate features a dedicated PLA-specific surface that provides strong adhesion at lower bed temperatures, reducing warping on large prints. The built-in chamber camera with dual LED lighting allows real-time monitoring and time-lapse capture. The included ElegooSlicer is straightforward and supports WiFi direct printing from the same network.
At 38.5 pounds, this is a heavy machine that needs a sturdy desk — the die-cast frame is a double-edged sword. Some early units had hotend communication errors due to cable routing issues near the fragile USB-C connection, though replacement units have proven reliable beyond 300–400 hours. For a beginner who wants the stability of an enclosed CoreXY with industrial-grade materials at a middle-market price, the Centauri Carbon is a strong contender.
Why it’s great
- Die-cast aluminum frame for minimal vibration
- 320°C hotend for advanced filaments
- Enclosed chamber with enhanced cooling
- Dual-sided PEI plate with PLA-specific surface
Good to know
- Heavy (38.5 lbs) requires sturdy desk
- Early units had USB-C cable routing issues
- Tech support can be slow for warranty claims
5. FLASHFORGE Adventurer 5M

The FLASHFORGE Adventurer 5M is built for speed, with a CoreXY system that reaches 600 mm/s and accelerates at 20,000 mm/s². The 0.025-second ramp from zero to top speed means it finishes prints in a fraction of the time of a typical bedslinger. One-click full-auto leveling handles bed calibration, and the vibration compensation firmware eliminates ghosting on fast corners. The 220 × 220 × 220 mm build volume is smaller than some competitors but sufficient for most starter projects.
The direct-drive extruder with a 280°C nozzle includes a quick-detach mechanism for tool-free swaps, and the 50W heating power brings the hotend to 200°C in 35 seconds. The dual-sided PEI coating plate provides reliable adhesion for PLA, PETG, and TPU, and can handle PLA-CF with the optional 0.6 mm nozzle. Filament run-out detection and power-loss recovery prevent wasted prints. The all-metal frame feels robust despite the modest footprint, and the fully open design makes it easy to monitor prints.
The firmware can occasionally freeze, requiring a power cycle, and the automatic sensor may continue printing even after the filament runs out if the detection isn’t triggered correctly. An enclosure kit is not available from FLASHFORGE, limiting high-temperature material use. For beginners who value speed over enclosed printing and want a reliable machine with a small desk footprint, the Adventurer 5M delivers excellent value. The support team is responsive and has replaced faulty sensors quickly for users.
Why it’s great
- Ultra-fast 600 mm/s CoreXY with 20,000 mm/s² accel
- Tool-free quick-detach nozzle for easy swaps
- Excellent first-layer adhesion with dual-sided PEI plate
- Responsive tech support for warranty issues
Good to know
- Modest 220 mm³ build volume
- No official enclosure for high-temp filaments
- Firmware freezes reported on some units
6. Creality Ender-3 V3 KE

The Creality Ender-3 V3 KE is a direct evolution of the legendary Ender series, swapping the old manual-leveling headache for a CR Touch auto-leveling sensor and a Sprite direct-drive extruder that reaches 300°C. Printing at 500 mm/s with 8,000 mm/s² acceleration, it keeps pace with newer designs while maintaining the massive modding community that has made the Ender name a staple. The 220 × 220 × 250 mm build volume is standard, but the all-in-one design cuts assembly time to roughly 10 minutes.
The 60W ceramic heater and bi-metal heatbreak enable smooth feeding of PLA, PETG, ABS, TPU (95A), and ASA filaments. The X-axis carriage uses ball bearings for smooth motion, and the dual-fan cooling system keeps overhangs clean. The touch UI screen with real-time model preview simplifies operation, and smart algorithms mitigate ghosting through input shaping. Filament detection and power-loss recovery add peace of mind for long prints.
Assembly is straightforward, though the touch screen bracket can be frustrating to attach — the screw guides may not align perfectly, requiring patience. Fan noise is noticeable in a quiet room, and the auto-leveling sensor may need careful initial calibration to avoid bed crashes. For the beginner who wants a printer with endless upgrade potential — linear rails, direct drive upgrades, alternative hotends — the Ender-3 V3 KE is the gateway. The community knowledge base is unparalleled, making troubleshooting much easier than with proprietary machines.
Why it’s great
- Huge modding community with countless upgrades
- Sprite direct-drive extruder for flexible filaments
- 300°C hotend with bi-metal heatbreak
- Fast 500 mm/s with input shaping
Good to know
- Touch screen bracket alignment can be tricky
- Fan noise is noticeable in quiet environments
- Some initial calibration patience required
7. ANYCUBIC Photon Mono 4

The ANYCUBIC Photon Mono 4 is a resin printer that achieves a 10K resolution across a 7-inch monochrome LCD, producing pixel dimensions of just 17 × 17 μm on the X and Y axes. This translates to layer lines that are virtually invisible to the naked eye and surface detail that rivals injection-molded parts. The 6.04″ × 3.42″ × 6.49″ build volume is enough for tabletop miniatures, jewelry molds, and dental models, and the LighTurbo matrix light source delivers uniform UV exposure to minimize rasterization artifacts.
The laser-engraved build platform 2.0 improves adhesion to prevent warping or lifting during printing, while the 4-point leveling method is designed for absolute beginners — after the first calibration, repeat leveling is unnecessary. Printing speed reaches 70 mm/h on the Z-axis, which is competitive for a resin printer in this tier. The resume-print function after power loss reduces material waste, and the LCD screen replacement cost is reasonable at roughly –. The user-friendly slicer includes pre-configured profiles that eliminate guesswork with exposure times.
Resin printing inherently requires ventilation, nitrile gloves, and post-processing (washing and curing) that FDM users avoid. Some users report that the FEP vat is a proprietary unit that scratches easily, and the mostly plastic chassis feels less durable than metal-frame alternatives. For a beginner who prioritizes extraordinary print detail over convenience and is willing to manage the extra workflow steps, the Photon Mono 4 offers an unbeatable resolution-to-price ratio. The quality of tiny lettering and fine surface textures is genuinely impressive.
Why it’s great
- Exceptional 10K resolution with 17 μm pixels
- LighTurbo matrix for uniform UV exposure
- Laser-engraved plate for strong adhesion
- Simple 4-point leveling ideal for beginners
Good to know
- Requires ventilation, gloves, and post-processing
- Proprietary FEP vat scratches more easily
- Smaller print volume than FDM machines
8. Geeetech Smart M1S
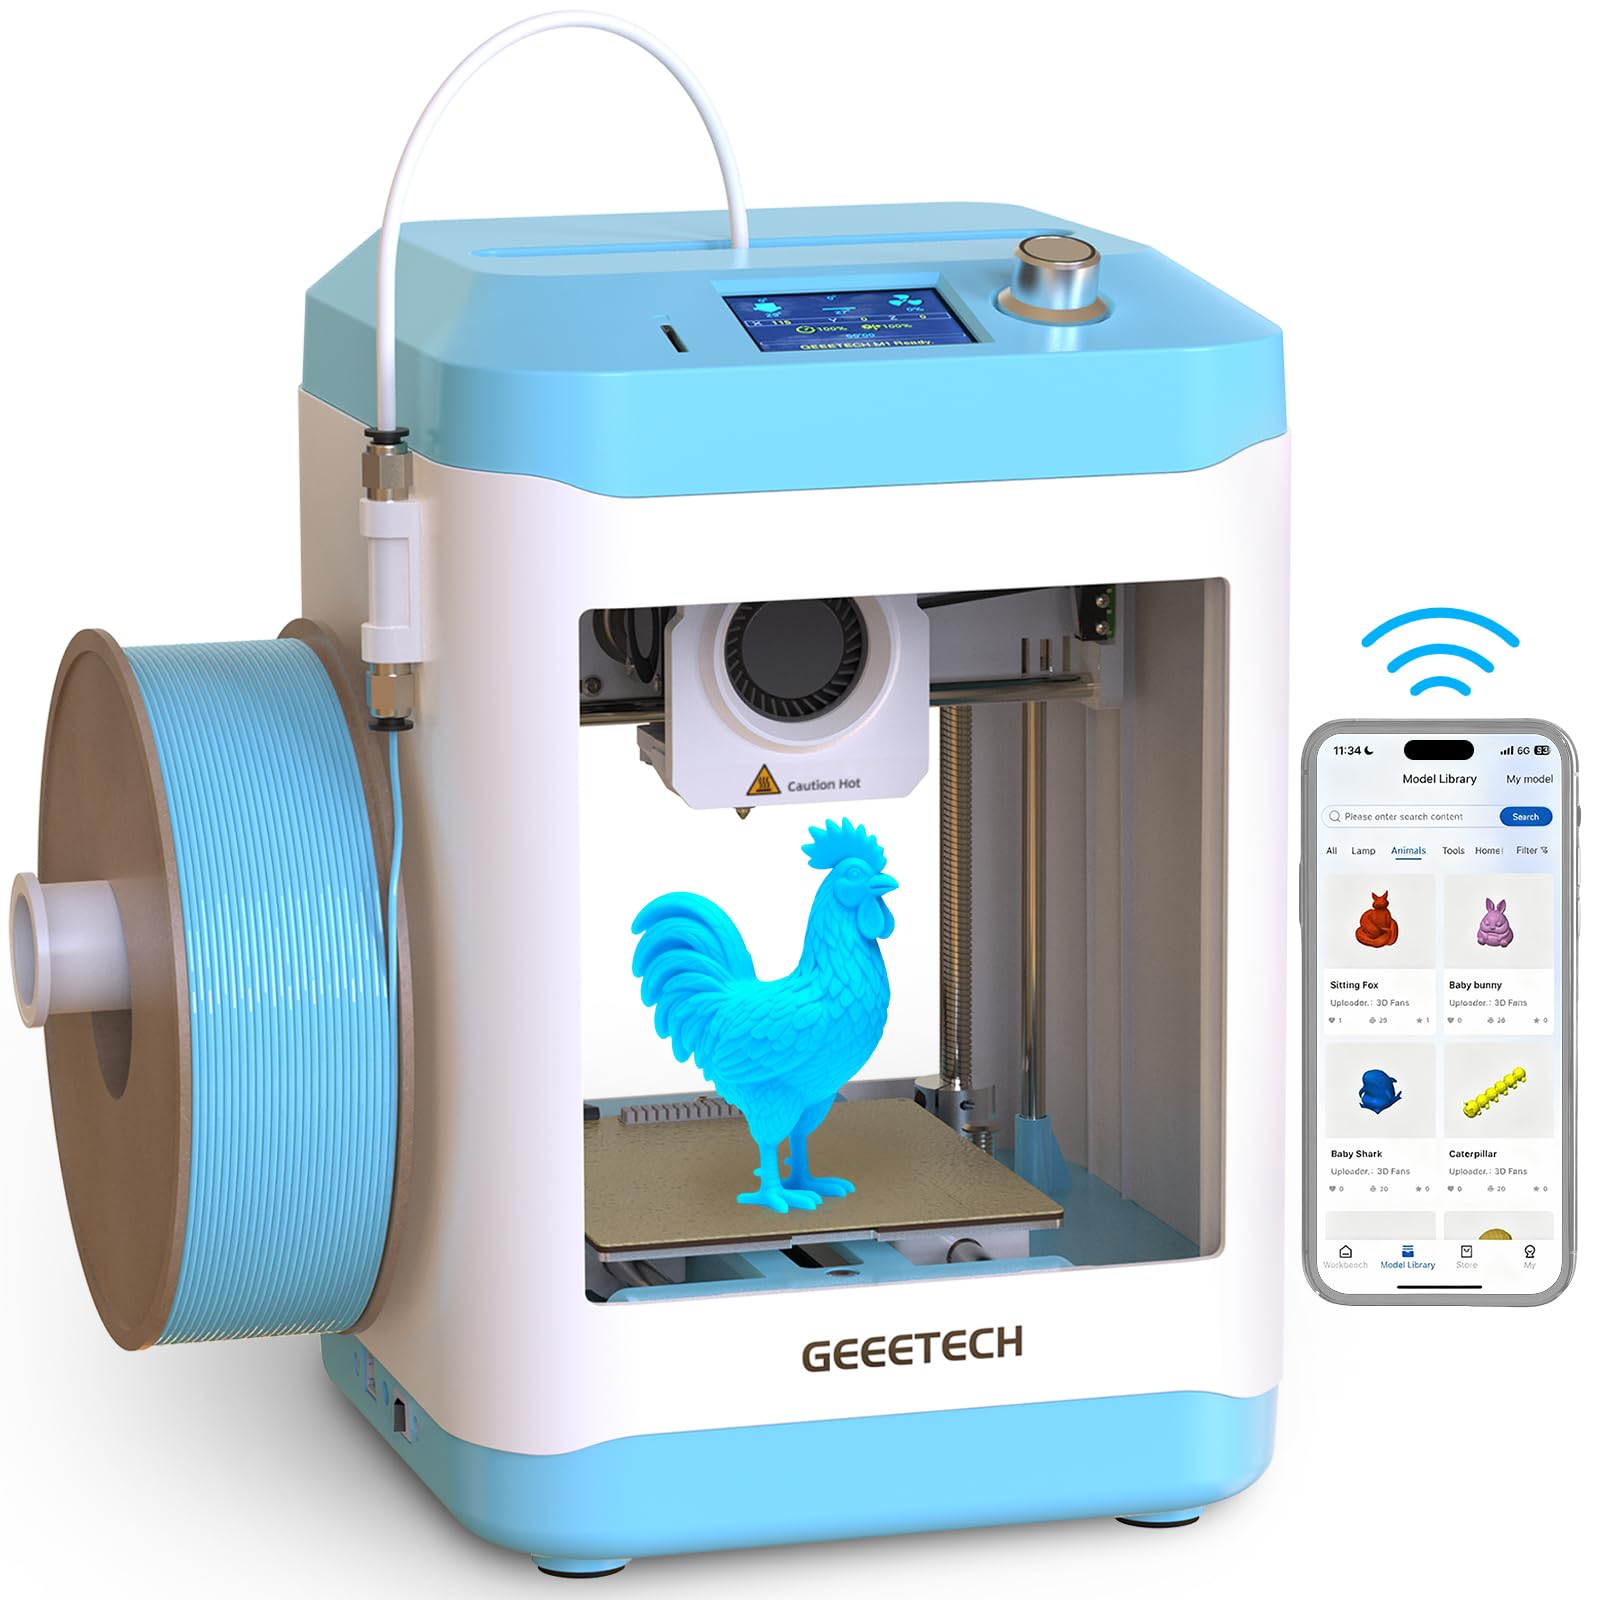
The Geeetech Smart M1S is an ultra-compact FDM printer with a 100 × 110 × 100 mm (roughly 4″ cube) build volume, designed for users who need a small, quiet machine for educational settings, travel, or small toys. The 16-point full-auto leveling system and heated PEI plate simplify first-layer success, and the 250 mm/s printing speed is respectable for a printer this size. The dual-drive metal gear extruder with a 1:5 gear ratio provides enough torque to handle both PLA and TPU filament.
The fully assembled unit requires no setup beyond plugging it in and loading filament via the one-button in/out system. The 2.4″ LCD color screen and built-in LED lighting provide clear visibility of the print progress. It ships with a 0.5 kg filament spool, though a 1 kg spool holder model is available for download. The 50W hot-end heating rod with efficient heat dissipation ensures stable extrusion at the 250 mm/s max speed. The magnetic flexible build plate allows prints to pop off with a simple bend.
The tiny print volume is a significant limitation — you cannot print anything larger than a small action figure or a phone stand in sections. WiFi connectivity has been reported as unreliable by some users, and the SD card method is more dependable. The first unit failure rate appears higher than average, but Geeetech support has been responsive in providing replacements. For a family with young children, a classroom, or anyone with extreme space constraints who wants a no-fuss introduction to FDM printing, the M1S fills a specific niche well.
Why it’s great
- Extremely compact footprint ideal for desks or classrooms
- 16-point auto-leveling reduces setup frustration
- Dual-drive extruder handles flexible materials
- Fully assembled with one-button filament loading
Good to know
- Very small 4″ cube build volume
- WiFi connectivity can be unreliable
- Higher rate of initial defects reported
9. Entina Tina2C
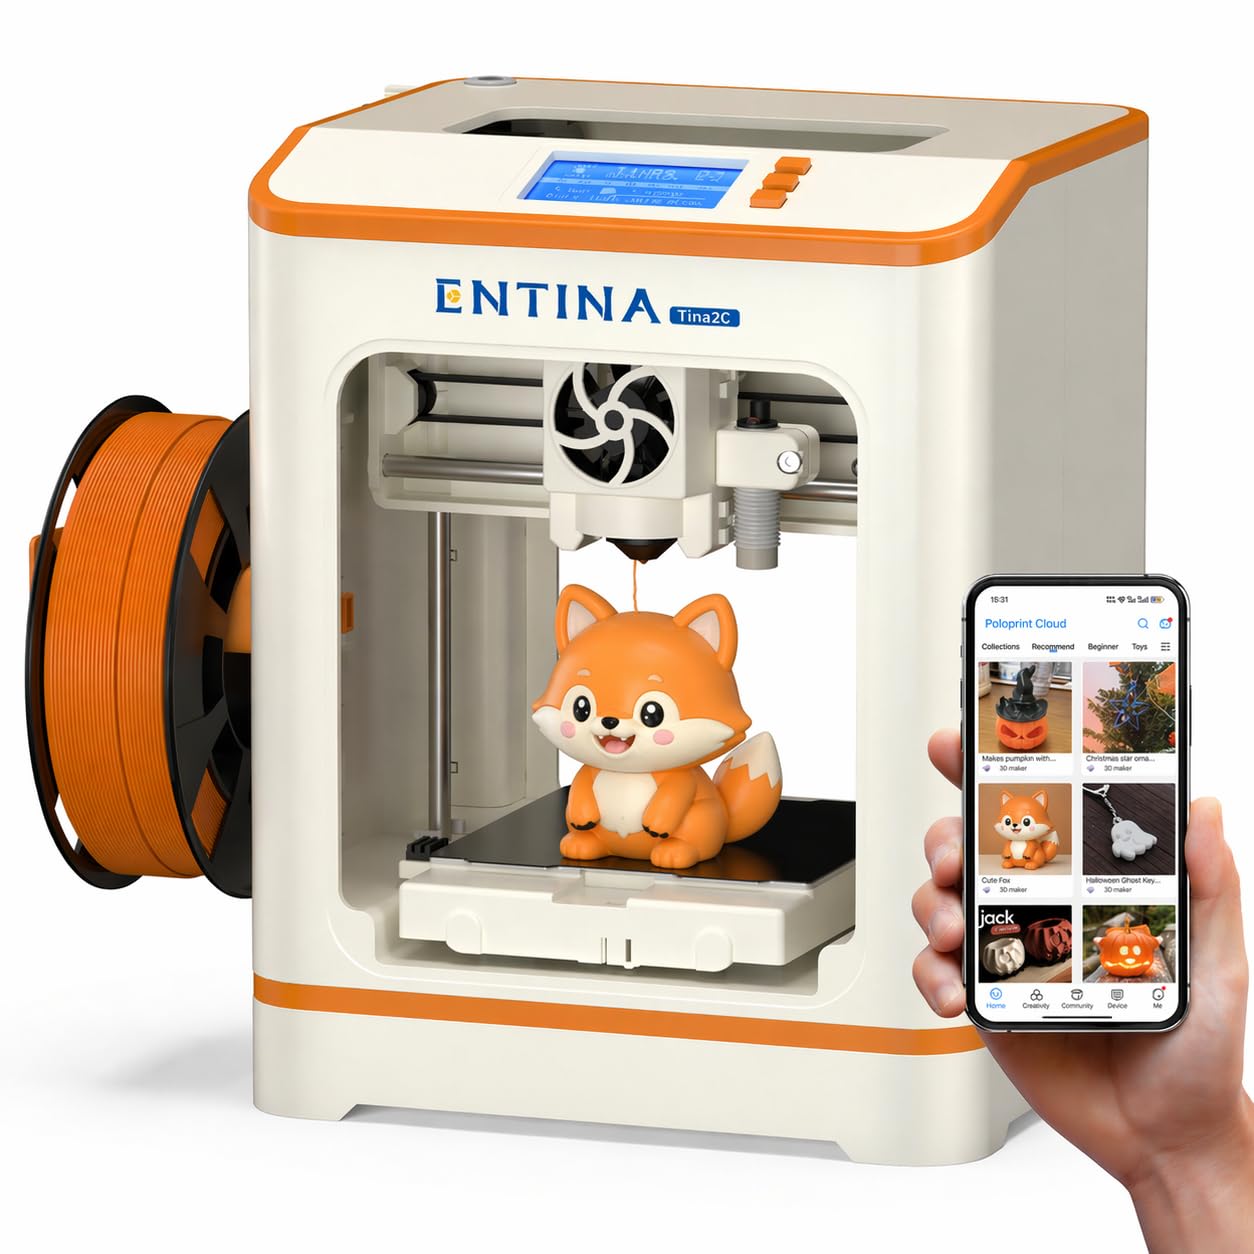
The Entina Tina2C is purpose-built for children and absolute beginners, with a guided setup through the Poloprint Cloud app that promises the first print within 8 minutes of unboxing. The 3.9″ × 3.9″ × 3.9″ build volume is tiny, but the focus is on simplicity and safety: smooth rounded edges, low-noise operation, and integrated LED lighting for visibility. The magnetic flexible build plate lets kids pop off finished prints without tools, and the self-cleaning nozzle design reduces maintenance frustration.
AI-powered features in the app include photo-to-print conversion and a library of over 1,500 pre-sliced models. STEM learning courses and 20+ creative DIY modules are updated regularly, turning the printer into an educational tool rather than just a toy. The auto-leveling system eliminates manual bed adjustment, and power-loss recovery adds reliability. The compact body measures just 8 × 6.5 × 10 inches, making it easy to tuck onto a shelf or desk. It supports both 2.4G WiFi printing and TF card offline mode.
The small print size is a hard limit — you cannot print anything larger than a small action figure. The app can be slightly finicky when downloading community prints, and the proprietary slicer integration may not appeal to users who want full control. For a parent looking to introduce 3D printing to a child without the steep learning curve of open-source slicers and bed leveling, the Tina2C removes all friction. It works with Cura and Simplify3D for future expansion, so the child can grow into more advanced workflows.
Why it’s great
- 8-minute setup with app-guided workflow
- Self-cleaning nozzle reduces clog frustration
- Auto-leveling and power-loss recovery
- 1,500+ pre-sliced model library for instant printing
Good to know
- Very small 3.9″ cube build volume
- App can be slightly finicky with downloads
- Not suitable for larger functional projects
FAQ
Do I need ventilation for a resin printer?
What filaments can a beginner realistically start with?
How often do I need to maintain a beginner 3D printer?
Can I print unattended overnight with a beginner printer?
Final Thoughts: The Verdict
For most users, the best beginner 3d printers winner is the Bambu Lab A1 because it delivers appliance-grade reliability with full auto-calibration and whisper-quiet operation. If you want enclosed high-temperature capability for carbon fiber and ABS, grab the Creality K1C. And for a detail-obsessed miniature painter, nothing beats the ANYCUBIC Photon Mono 4 and its stunning 10K resolution.

Mo Maruf
I created WellFizz to bridge the gap between vague wellness advice and actionable solutions. My mission is simple: to decode the research and give you practical tools you can actually use.
Beyond the data, I am a passionate traveler. I believe that stepping away from the screen to explore new environments is essential for mental clarity and physical vitality.